Anyone who has planted zucchini (or is friends with anyone who has) knows that zucchini is prolific. During the summer months we have no shortage of zucchini and yellow squash. Like any good zucchini grower, we have lots of ways to fix this versatile squash.
One of our most favorite ways to eat them is in this simple side dish, which we call “Cheesy Squash” for obvious reasons. Cheesy squash is a family favorite on my husband’s side, so I learned about it from both my husband and my mother-in-law.
We always receive rave reviews when we share cheesy squash at gatherings. Everyone wants to know how we make it, then when we tell them, they can’t get over how simple it is!
Like any classic family recipe, there’s more a set of directions than an actual recipe. I’ll explain the way we make it and you can feel free to adapt it the way you like!
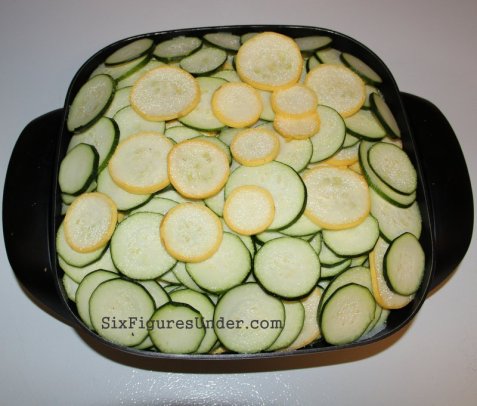
We pick our squash when it’s ripe, but not overly ripe. Well, we pick those too, but use those zucchini clubs in other recipes. I used all of the squash pictured (about 5 pounds) in one batch.
You can cut the squash by hand with a knife, of course, but having a mandolin slicer really speeds things up and ensures that your slices are even.
We slice the yellow squash and zucchini about 3/16 of an inch thick. You can go a little thicker, but if you go much thinner, it turns to mush when it’s cooked. You don’t have to have a handy mandolin slicer. We’ve done it with a knife as well, but it does take longer that way.
We layer the slices in an electric skillet, making sure to separate any pieces that are directly on top of each other (as if they weren’t cut). Pile the squash up as high as you can and still have the lid fit. It will cook down. We fit 5 lbs of squash in our electric skillet. My mother-in-law has a skillet more like this that fits about twice as much squash because it’s not only longer, but deeper as well.
My husband puts a tablespoon or two of water in the bottom to keep the squash from burning. My mother in law uses no water, but starts the temperature a little lower so the squash has time to release some moisture before the bottom gets burned. Either way works, although they’ll both tell you their way is better.
Sprinkle 1 to 1.5 Tablespoons of salt evenly-ish over the top. Don’t fret if some pieces look super salty. When it starts steaming, the salt will amazingly spread evenly throughout!
Plug her in and set the temperature to about 300 degrees.
It will get nice and steamy in there. After about 20 minutes, take a peek. If you have less squash, check it after 12-15 minutes.
The squash should be wilty and allow a knife to cut through the layers with ease.
Cover the squash with shredded cheese to your liking. Some will melt immediately. The rest will melt quickly if you put the lid back on (with the power off) for a couple minutes.
Serve as a side dish with any summer meal, or just have a some for a snack!
One skillet-ful lasts us about two meals and two or three squash plants can produce a skillet of squash twice a week at their peak, so we eat a lot of this. Just store leftovers in an airtight container in the fridge and warm up in the microwave!
Note: This post contains a few affiliate links for some products I love. For more information, see my disclosure policy


Have you tried this in a crockpot? It might take a little longer, but do you think it might work?
I haven’t tried it in a crockpot, but I don’t sett why it wouldn’t work. I’ll have to give it a try!